ASP.NET Core 6 Web API 進行 JWT 令牌身份驗證

img

我們將討論使用 .NET Core API 6 的 JWT 令牌身份驗證和實現

在查看此博客之前,請訪問我的以下博客,了解 JWT 令牌身份驗證和授權的基礎知識和詳細信息,以及如何使用 JWT 進行工作。

JWT 令牌身份驗證和授權的介紹和詳細信息

讓我們開始.NET Core 6 Web API的實現,

步驟1:

建立 .NET Core 6 Web API 應用程式

第2步:

安裝我們將在整個應用程式中使用的以下 NuGet 套件。

Microsoft.AspNetCore.Authentication.JwtBearer

Microsoft.EntityFrameworkCore

Microsoft.EntityFrameworkCore.Design

Microsoft.EntityFrameworkCore.SqlServer

Microsoft.EntityFrameworkCore.Tools

Newtonsoft.Json

StackExchange.Redis

Swashbuckle.AspNetCore

步驟3:

接下來,在解決方案中建立新資料夾 Models 並在其中建立一個 Product 類別。

namespace KH.Lab.WebAPIJWT.Models
{
    public class Product
    {
        public int ProductId { get; set; }
        public string? ProductName { get; set; }
        public string? ProductDescription { get; set; }
        public int ProductCost { get; set; }
        public int ProductStock { get; set; }
    }

步驟4:

在Data資料夾內建立一個DbContextClass用於資料庫操作。

using KH.Lab.WebAPIJWT.Models;
using Microsoft.EntityFrameworkCore;

namespace KH.Lab.WebAPIJWT.Data
{
    public class DbContextClass : DbContext
    {
        protected readonly IConfiguration Configuration;
        public DbContextClass(IConfiguration configuration)
        {
            Configuration = configuration;
        }
        protected override void OnConfiguring(DbContextOptionsBuilder options)
        {
            options.UseSqlServer(Configuration.GetConnectionString("DefaultConnection"));
        }
        public DbSet<Product> Products { get; set; }
    }
}

第5步:

稍後,在 Controllers 資料夾中建立 ProductController。

using KH.Lab.WebAPIJWT.Cache;
using KH.Lab.WebAPIJWT.Data;
using KH.Lab.WebAPIJWT.Models;
using Microsoft.AspNetCore.Authorization;
using Microsoft.AspNetCore.Mvc;
using Microsoft.EntityFrameworkCore;

namespace KH.Lab.WebAPIJWT.Controllers
{
    [Route("api/[controller]")]
    [ApiController, Authorize]
    public class ProductController : ControllerBase
    {
        private readonly DbContextClass _context;
        private readonly ICacheService _cacheService;
        public ProductController(DbContextClass context, ICacheService cacheService)
        {
            _context = context;
            _cacheService = cacheService;
        }
        [HttpGet]
        [Route("ProductsList")]
        public async Task<ActionResult<IEnumerable<Product>>> Get()
        {
            var productCache = new List<Product>();
            productCache = _cacheService.GetData<List<Product>>("Product");
            if (productCache == null)
            {
                var product = await _context.Products.ToListAsync();
                if (product.Count > 0)
                {
                    productCache = product;
                    var expirationTime = DateTimeOffset.Now.AddMinutes(3.0);
                    _cacheService.SetData("Product", productCache, expirationTime);
                }
            }
            return productCache;
        }

        [HttpGet]
        [Route("ProductDetail")]
        public async Task<ActionResult<Product>> Get(int id)
        {
            var productCache = new Product();
            var productCacheList = new List<Product>();
            productCacheList = _cacheService.GetData<List<Product>>("Product");
            productCache = productCacheList.Find(x => x.ProductId == id);
            if (productCache == null)
            {
                productCache = await _context.Products.FindAsync(id);
            }
            return productCache;
        }

        [HttpPost]
        [Route("CreateProduct")]
        public async Task<ActionResult<Product>> POST(Product product)
        {
            _context.Products.Add(product);
            await _context.SaveChangesAsync();
            _cacheService.RemoveData("Product");
            return CreatedAtAction(nameof(Get), new { id = product.ProductId }, product);
        }
        [HttpPost]
        [Route("DeleteProduct")]
        public async Task<ActionResult<IEnumerable<Product>>> Delete(int id)
        {
            var product = await _context.Products.FindAsync(id);
            if (product == null)
            {
                return NotFound();
            }
            _context.Products.Remove(product);
            _cacheService.RemoveData("Product");
            await _context.SaveChangesAsync();
            return await _context.Products.ToListAsync();
        }

        [HttpPost]
        [Route("UpdateProduct")]
        public async Task<ActionResult<IEnumerable<Product>>> Update(int id, Product product)
        {
            if (id != product.ProductId)
            {
                return BadRequest();
            }
            var productData = await _context.Products.FindAsync(id);
            if (productData == null)
            {
                return NotFound();
            }
            productData.ProductCost = product.ProductCost;
            productData.ProductDescription = product.ProductDescription;
            productData.ProductName = product.ProductName;
            productData.ProductStock = product.ProductStock;
            _cacheService.RemoveData("Product");
            await _context.SaveChangesAsync();
            return await _context.Products.ToListAsync();
        }
    }
}

第6步:

現在,我們將在該應用程式中使用 Redis 緩存。如果您了解分佈式 Redis 緩存的工作原理,請看以下文章

.NET Core Web API 中 Redis 緩存的實現

第7步:

在解決方案中建立 Cache 資料夾,並為 Redis 和 Connection Helper 建立一些類。因此,首先,為Redis緩存建立ICacheService和CacheService。

namespace KH.Lab.WebAPIJWT.Cache
{
    public interface ICacheService
    {
        /// <summary>
        /// Get Data using key
        /// </summary>
        /// <typeparam name="T"></typeparam>
        /// <param name="key"></param>
        /// <returns></returns>
        T GetData<T>(string key);
        /// <summary>
        /// Set Data with Value and Expiration Time of Key
        /// </summary>
        /// <typeparam name="T"></typeparam>
        /// <param name="key"></param>
        /// <param name="value"></param>
        /// <param name="expirationTime"></param>
        /// <returns></returns>
        bool SetData<T>(string key, T value, DateTimeOffset expirationTime);
        /// <summary>
        /// Remove Data
        /// </summary>
        /// <param name="key"></param>
        /// <returns></returns>
        object RemoveData(string key);
    }
}

接下來,為 Redis 緩存相關功能建立 CacheService 類別。

using Newtonsoft.Json;
using StackExchange.Redis;

namespace KH.Lab.WebAPIJWT.Cache
{
    public class CacheService : ICacheService
    {
        private IDatabase _db;
        public CacheService()
        {
            ConfigureRedis();
        }
        private void ConfigureRedis()
        {
            _db = ConnectionHelper.Connection.GetDatabase();
        }
        public T GetData<T>(string key)
        {
            var value = _db.StringGet(key);
            if (!string.IsNullOrEmpty(value))
            {
                return JsonConvert.DeserializeObject<T>(value);
            }
            return default;
        }
        public bool SetData<T>(string key, T value, DateTimeOffset expirationTime)
        {
            TimeSpan expiryTime = expirationTime.DateTime.Subtract(DateTime.Now);
            var isSet = _db.StringSet(key, JsonConvert.SerializeObject(value), expiryTime);
            return isSet;
        }
        public object RemoveData(string key)
        {
            bool _isKeyExist = _db.KeyExists(key);
            if (_isKeyExist == true)
            {
                return _db.KeyDelete(key);
            }
            return false;
        }
    }
}

步驟8:

建立 ConfigurationManager 類,用於配置 appsetting.json 文件

namespace KH.Lab.WebAPIJWT
{
    static class ConfigurationManager
    {
        public static IConfiguration AppSetting { get; }
        static ConfigurationManager()
        {
            AppSetting = new ConfigurationBuilder()
                    .SetBasePath(Directory.GetCurrentDirectory())
                    .AddJsonFile("appsettings.json")
                    .Build();
        }
    }
}

第9步:

接下來,在緩存資料夾內建立 ConnectionHelper 類以取得 RedisURL 並將其配置到應用程式中。

using StackExchange.Redis;

namespace KH.Lab.WebAPIJWT.Cache
{
    public class ConnectionHelper
    {
        static ConnectionHelper()
        {
            ConnectionHelper.lazyConnection = new Lazy<ConnectionMultiplexer>(() =>
            {
                return ConnectionMultiplexer.Connect(ConfigurationManager.AppSetting["RedisURL"]);
            });
        }
        private static Lazy<ConnectionMultiplexer> lazyConnection;
        public static ConnectionMultiplexer Connection
        {
            get
            {
                return lazyConnection.Value;
            }
        }
    }
}

第10步:

現在,我們將為 JWT 身份驗證部分建立 Login 和 JWTTokenResponse 類別

namespace KH.Lab.WebAPIJWT.Models
{
    public class Login
    {
        public string? UserName { get; set; }
        public string? Password { get; set; }
    }
}

另外,為令牌建立 JWTTokenResponse 類

namespace KH.Lab.WebAPIJWT.Models
{
    public class JWTTokenResponse
    {
        public string? Token { get; set; }
    }
}

第11步:

稍後,在控制器中建立 AuthenticationController 以進行用戶身份驗證。

using KH.Lab.WebAPIJWT.Models;
using Microsoft.AspNetCore.Mvc;
using Microsoft.IdentityModel.Tokens;
using System.IdentityModel.Tokens.Jwt;
using System.Security.Claims;
using System.Text;

namespace KH.Lab.WebAPIJWT.Controllers
{
    [Route("api/[controller]")]
    [ApiController]
    public class AuthenticationController : ControllerBase
    {
        [HttpPost("login")]
        public IActionResult Login([FromBody] Login user)
        {
            if (user is null)
            {
                return BadRequest("Invalid user request!!!");
            }
            if (user.UserName == "string" && user.Password == "string")
            {
                var secretKey = new SymmetricSecurityKey(Encoding.UTF8.GetBytes(ConfigurationManager.AppSetting["JWT:Secret"]));
                var signinCredentials = new SigningCredentials(secretKey, SecurityAlgorithms.HmacSha256);
                var tokeOptions = new JwtSecurityToken(
                    issuer: ConfigurationManager.AppSetting["JWT:ValidIssuer"],
                    audience: ConfigurationManager.AppSetting["JWT:ValidAudience"],
                    claims: new List<Claim>(),
                    expires: DateTime.Now.AddMinutes(6),
                    signingCredentials: signinCredentials
                );
                var tokenString = new JwtSecurityTokenHandler().WriteToken(tokeOptions);
                return Ok(new JWTTokenResponse { Token = tokenString });
            }
            return Unauthorized();
        }
    }
}
  • 我們從用戶那裡取得用戶名和密碼,然後取得我們放入 appsettings.json 文件中的密鑰

  • 接下來,使用 HMAC SHA256 加密算法的密鑰建立編碼字符串的簽名憑據。

  • 後來,我們在建立令牌時增加了一些屬性,例如簽名憑據、過期時間、發行者、受眾以及根據我們的需要和要求的不同類型的聲明。

  • 最後,使用令牌處理程式建立令牌,並將其以編碼形式發送給最終用戶。

步驟12:

在 appsetting.json 文件中增加一些環境變數

{
  "Logging": {
    "LogLevel": {
      "Default": "Information",
      "Microsoft.AspNetCore": "Warning"
    }
  },
  "AllowedHosts": "*",
  "RedisURL": "localhost:6379",
  "JWT": {
    "ValidAudience": "http://localhost:7299",
    "ValidIssuer": "http://localhost:7299",
    "Secret": "JWTAuthentication@777"
  },
  "ConnectionStrings": {
    "DefaultConnection": "Server=(localdb)\\mssqllocaldb;Database=JWT;Trusted_Connection=True;MultipleActiveResultSets=true;"
  }
}

步驟13:

接下來,在 Program 類中註冊與 JWT 身份驗證、用於身份驗證的 Swagger UI、CORS 策略和緩存服務相關的所有服務器,如下所示

using KH.Lab.WebAPIJWT.Cache;
using KH.Lab.WebAPIJWT.Data;
using Microsoft.AspNetCore.Authentication.JwtBearer;
using Microsoft.IdentityModel.Tokens;
using Microsoft.OpenApi.Models;
using System.Text;

var builder = WebApplication.CreateBuilder(args);

// Add services to the container.

builder.Services.AddControllers();
// Learn more about configuring Swagger/OpenAPI at https://aka.ms/aspnetcore/swashbuckle
builder.Services.AddEndpointsApiExplorer();
builder.Services.AddSwaggerGen(options =>
{
    options.SwaggerDoc("V1", new OpenApiInfo
    {
        Version = "V1",
        Title = "WebAPI",
        Description = "JWT WebAPI Lab"
    });
    options.AddSecurityDefinition("Bearer", new OpenApiSecurityScheme
    {
        Scheme = "Bearer",
        BearerFormat = "JWT",
        In = ParameterLocation.Header,
        Name = "Authorization",
        Description = "Bearer Authentication with JWT Token",
        Type = SecuritySchemeType.Http
    });
    options.AddSecurityRequirement(new OpenApiSecurityRequirement
    {
        {
            new OpenApiSecurityScheme
            {
                Reference = new OpenApiReference
                {
                    Id = "Bearer",
                    Type = ReferenceType.SecurityScheme
                }
            },
            new List<string>()
        }
    });
});
builder.Services.AddScoped<ICacheService, CacheService>();
builder.Services.AddDbContext<DbContextClass>();
builder.Services.AddAuthentication(opt => {
    opt.DefaultAuthenticateScheme = JwtBearerDefaults.AuthenticationScheme;
    opt.DefaultChallengeScheme = JwtBearerDefaults.AuthenticationScheme;
})
    .AddJwtBearer(options =>
    {
        options.TokenValidationParameters = new TokenValidationParameters
        {
            ValidateIssuer = true,
            ValidateAudience = true,
            ValidateLifetime = true,
            ValidateIssuerSigningKey = true,
            ValidIssuer = KH.Lab.WebAPIJWT.ConfigurationManager.AppSetting["JWT:ValidIssuer"],
            ValidAudience = KH.Lab.WebAPIJWT.ConfigurationManager.AppSetting["JWT:ValidAudience"],
            IssuerSigningKey = new SymmetricSecurityKey(Encoding.UTF8.GetBytes(KH.Lab.WebAPIJWT.ConfigurationManager.AppSetting["JWT:Secret"]))
        };
    });

var app = builder.Build();

// Configure the HTTP request pipeline.
if (app.Environment.IsDevelopment())
{
    app.UseSwagger();
    app.UseSwaggerUI(options => {
        options.SwaggerEndpoint("/swagger/V1/swagger.json", "JWT WebAPI Lab");
    });
}

app.UseHttpsRedirection();
app.UseAuthentication();
app.UseAuthorization();
app.MapControllers();
app.UseCors(x => x
        .AllowAnyOrigin()
        .AllowAnyMethod()
        .AllowAnyHeader());
app.Run();

第14步:

最後,在「套件管理主控台」中執行以下命令進行資料庫更新。
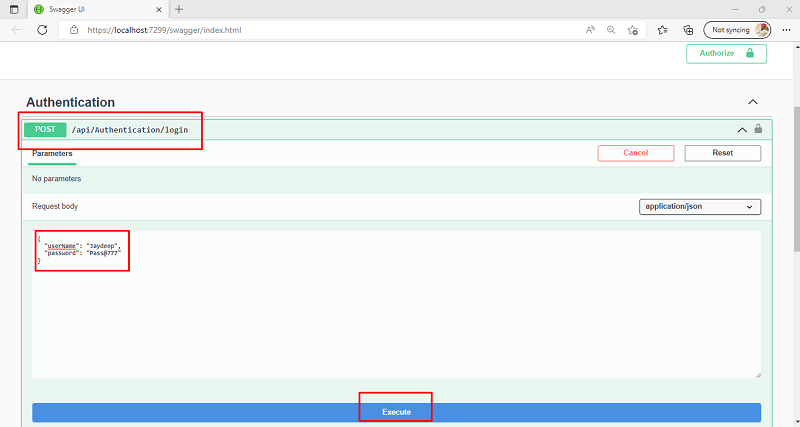
add-migration “First”
update-database

第15步:

運行應用程式並在提供憑據後建立令牌,並將其放入 swagger UI 內的“授權”選項卡中,如下圖所示

img
img
img
img
img
img

所以,這就是 .NET Core 6 Web API 中的 JWT 身份驗證。

我希望您理解這些事情並且現在了解事情是如何運作的。

快樂編碼!

Last updated